
Get Educated & Inspired
On The Blog
Recently, I wrote a blog called “5 Photography Tips For Beginners” where I talk about some of the quintessential steps you should take before even buying a camera.
In this post, I’m going to show you step by step how to become the master of manual mode and understanding camera settings.
Before buying a camera, I encourage you to study these terms I am about to share with you.
The reason for this is because a lot of beginners will become so caught up on what type of camera they buy, that they don’t realize that part of what makes you a good photographer is by understanding what’s called “The Exposure Triangle.”

I’ve seen a lot of people who don’t understand manual mode, and they get frustrated by the fact that their photos don’t turn out well.
So, let’s get started!
What Is Manual Mode?
Basically, DSLR (digital single-lens reflex) cameras have multiple settings, one of those being “Manual Mode”.
This mode (typically expressed on the camera body as “M”) is what allows the photographer to manually adjust the exposure of the photo.
This is great as it gives you total control over the outcome of your photos!
But it’s also one of the most difficult settings to master. Because in order to take quality photos, you have to understand how all of the settings work together.
So you might be wondering “But Taylor, don’t these cameras have auto mode?”
The answer is yes!
Auto mode is great and useful, but I wouldn’t recommend using it a lot as a beginner.
Not to mention that you can actually produce a better outcome with manual mode.
Here are the reasons why I strongly advise against learning in auto mode:
- The camera does all the work for you, and you’re not learning how to adjust your settings to account for the conditions you’re shooting in.
- Your quality of photos have a stronger chance in manual mode than auto mode.
- You’re smarter than auto mode. The camera won’t get the settings correct 100% of the time.
However, I do think that auto mode is a good hint when you’re learning manual mode. Sometimes I’ll switch to auto mode as a reference to see what settings it suggests, and then make my manual settings from there.
[convertkit form=1538577]
ISO, Aperture, Shutter Speed
Okay, so this is about to become a lot of information at once…but I’ll try to break it down!
These three terms are used to make up the Exposure Triangle.
All three of these settings work together to help capture a good quality image, so it’s really important to have a good understanding of how it works and why.
With that being said, let’s talk about ISO first.
ISO
There’s a lot of buzz about what ISO actually stands for…so, I’ve pulled a quote from the International Standardization for Organization’s website:
“Because ‘International Organization for Standardization’ would have different acronyms in different languages (IOS in English, OIN in French for Organisation internationale de normalisation), our founders decided to give it the short form ISO. ISO is derived from the Greek isos, meaning equal. Whatever the country, whatever the language, we are always ISO.”
But try not to get too caught up in what it stands for…this term was developed during the days of film photography, and now that everything is digital it brings an entirely new meaning.
For now, think of ISO as a sensitivity to light.
This sensitivity is represented in numbers, which can get a little confusing, so bare with me here.
Lower ISO numbers mean it’s NOT as sensitive to light, whereas high ISO numbers mean it IS sensitive to light.
For example…

In this photo you’ll see that as the ISO number gets higher, the photo gets grainy and/or “noisy”.
When you’re shooting in broad daylight and it’s bright and sunny, you would want to set your ISO at something around 100. This is because it is less sensitive to light.
If you’re shooting at dusk, you will want to raise your ISO because you have less natural light to work with…make sense?
I’m going to reference this photo below on a few different occasions.

Don’t let this intimidate you – I promise it’s not as hard as it looks!
Let’s focus on the very bottom row in that photo…it’s similar to the photo I shared previously. So, the lower the ISO, the less noise. The higher the ISO, the more noise.
Being able to understand this photo will help you understand why ISO, Aperture, and Shutter Speed all work together.
So, let’s talk about Aperture for a moment.
Aperture
Aperture is defined as the opening within the lens in which light passes through to enter the camera.
The easiest way to think about this is to think of the lens as the human eye.
Have you ever noticed someone’s pupils get larger or smaller? When you go between light and dark environments, the human eye will expand or contract the pupil to let in a certain amount of light.
So, let’s think about the lens being equivalent to the pupil of the human eye.
In the second row of this chart, let’s focus on this for a second. You’ll see how it starts at F/1,4 and goes all the way up to F/32 (let’s ignore the numbers for now).
F/1,4 has a wide open circle, meaning it is referred to as Large Aperture. This is because the lens is now opened up to let more light pass through.
F/32 has a very small closed circle, meaning it is referred to as Small Aperture. This is because the lens is more closed-off to let less light pass through.
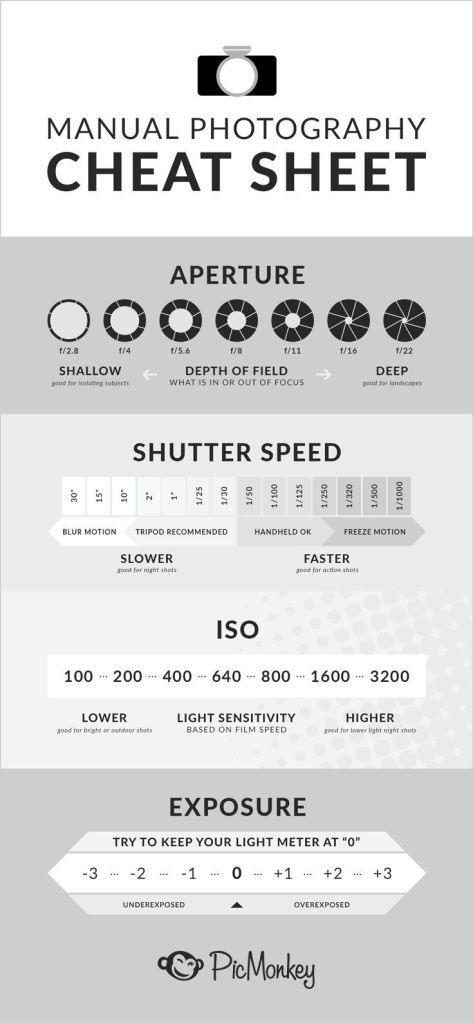
Now if you look at the photo above, this shows how aperture affects Depth of Field.
If you want a blurred background to bring your subject into focus, you’ll want to use a larger aperture (which is actually a “smaller number” so be careful here).
If you are taking a photo of a landscape, you’ll want to use a smaller aperture (which is actually a “larger number”.)
So, let’s talk about these numbers now.
Aperture is also referred to as “F Stop” or “F Number”.
Let’s take F/8 for example. Think of this as a fraction, like ⅛. I’m not a math whiz, but I do know that ⅛ is much smaller than ½.
This is why F/8 is a smaller aperture than F/2, despite the number 8 being higher than the number 2.
Make sense?
If not, that’s totally okay! Try to take a break if it becomes too overwhelming. I want you to be able to understand this before moving on to the next steps, because all of these terms play critical roles within each other.
Shutter Speed
Shutter speed also plays a critical role in our photos – it changes the brightness of the photo as well as creating a feeling of stillness during fast motion.
Have you ever seen professional sports photography or even wildlife photography where it looks like the subject is captured completely still?
This is due to the camera’s shutter speed!
So let’s dive into understanding what shutter speed is all about.
As we talked about aperture being explained in numbers and fractions, shutter speed is also represented by numbers (and more specifically, time).

This one is a little bit more straightforward to understand…the higher the shutter speed, the faster it will capture the moving subject.
The lower the shutter speed, the slower it will capture the moving subject.
You’ll want to keep in mind that increasing or decreasing the shutter speed will affect the amount of light coming through, so it’s important to play around with these settings to make sure they’re going to give you the best outcome.
Let’s break it down in terms of numbers.
Shutter speed is measured in fractions of a second, if it is under one second.
So, a shutter speed of ¼ means it takes ¼ of a second for the shutter to close and then open.
A shutter speed of 1/1000 means it takes 1/1000 of a second. See the pattern?
For a fast-moving subject, you will want to use a faster shutter speed to catch them with full clarity and no blur.
This will give you that desired “freeze motion” effect. But be careful – if your shutter speed is too low, the subject will be blurry.
When you have a very slow shutter speed that takes longer than one second, this is how you can take long exposure shots, but we’ll get into that another time.
[convertkit form=1538577]
Wrapping Up
Okay, so we covered a lot! I totally understand if this information is overwhelming or a lot to understand.
I definitely recommend breaking it up and starting with one thing at a time. The more you understand your camera settings, the better your photos will be.
Also keep in mind that there are several other settings on your camera that are important to understand and utilize their functions – I’ll plan on breaking that down in a different blog post.
In the meantime, I always recommend playing around with your camera settings. Try not to get too wrapped up in doing any serious shoots at first.
Some of my friends let me practice taking some photos of them, and I just practiced taking landscape shots as well. This was so that I could explore my camera settings, composition, lighting, etc.
The more you practice, the better you’ll get. And then you’ll be on your way to great photos!
Share your thoughts in the comments below – Are you just getting started in photography? Have you been a photographer for a while?
Leave a Reply to Grace Cancel reply
We create professional photo and video content for brands and products.
Get in touch
What's your vision? Let's make it a reality together.


So much great info here! I’ve been wanting to get an actual camera as opposed to my phone, but was super intimidated. Thanks for breaking all this info down so simply! – Danielle
Thank you so much for the feedback! If you’re ready to get the camera – go for it! Photography is such an amazing creative outlet (:
Thank you for the tips. I have a DSLR camera and have always wanted to take it out of auto and try out some of the settings. I have bookmarked this for further use.
That’s awesome! Best of luck!
Thank you for the very helpful tips!
Thank you for the feedback! Stay tuned for more!
Easy to follow and useful tips – thanks!
Thank you so much! Glad it was helpful (:
[…] Related Post: “Camera Settings For Beginners: Understanding The Exposure Triangle“ […]
Thanks for the tips! Pinned for later! I have a DSLR that I currently only use in Auto mode and I want to learn it better!!
very useful! thanks for sharing~!
[…] my recent blog “Camera Settings For Beginners: Understanding The Exposure Triangle”, I explained the three major components of the exposure triangle. In this post, I’m going to […]
[…] The “f/1.8” represents the Aperture. If you want to learn more in depth detail on what aperture means and how it relates to the exposure triangle, check out one of my other posts “Camera Settings For Beginners: Understanding The Exposure Triangle”. […]
[…] also encourage you to check out my recent blog “Camera Settings For Beginners: Understanding the Exposure Triangle” which is the perfect precursor to understanding aperture priority […]